Tuning and Deploying HF Transformers with Vertex AI — Part 1 Preparing Prerequisites and Dataset

Introduction
I believe that Google’s documentation is very hard to understand especially when it comes to Vertex AI. It took me days to create a hyperparameter-tuning job, get the best parameters, and train with these values. So, I’ve decided to write a medium post about it. It is a long journey and because of that, this will be a series of articles. The steps will be:
- Setting the infrastructure
- Uploading dataset
- Hyperparameter-tuning
- Training with the best parameters
- Deploying the model to an endpoint and getting the predictions
The final result will look like this
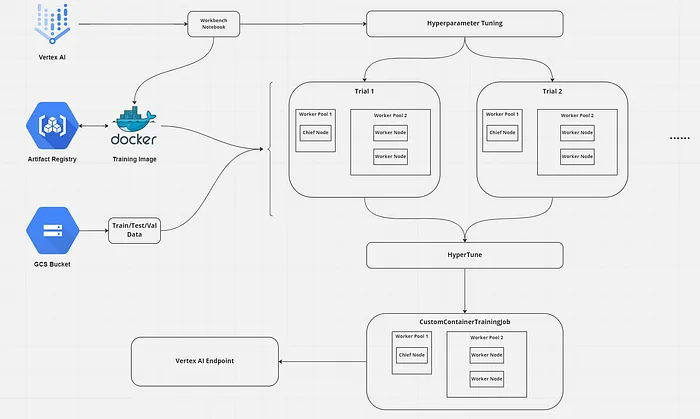
In this part, we will set the infrastructure to do training and serving.
In part 2, we will create our training image.
In part 3, we will start hyperparameter-tuning and training jobs and deploy the model to get predictions.
For looking at the whole code we will use check this GitHub repository
Prerequisites
- A Vertex AI Workbench instance or a service account file if you want to run the codes in your local and don’t want to install gcloud CLI
- A Google Cloud Storage bucket to store training data and save the trained models
- A Docker repository in the Artifact Registry
For all requirements, we will use the “europe-west4” region because it supports nearly all Vertex AI features and makes our life simpler. [1]
Creating the Workbench Instance
- You can type “Vertex AI” in the search bar and click the one under “Product and Pages”.
- Enable the API if you didn’t before.
- Click the Workbench option on the left menu.
- Enable Notebooks API if you didn’t before
- Click the “New notebook” button and choose Tensorflow Enterprise 2.8 without GPU (or 2.9 or 2.3 it really doesn’t matter)
- Name your notebook ( or not) and choose “europe-west4” as the region
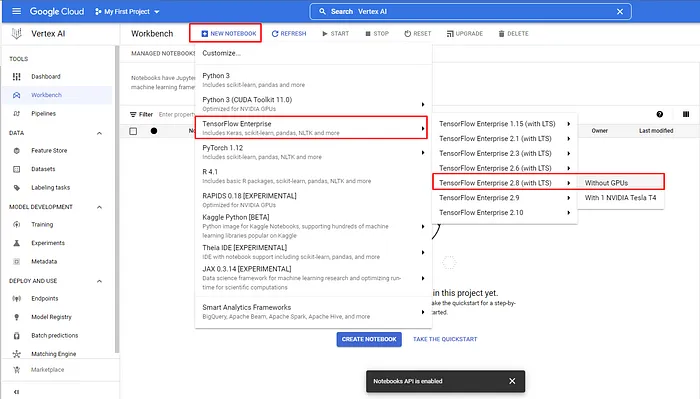
Creating Vertex AI Workbench Notebook
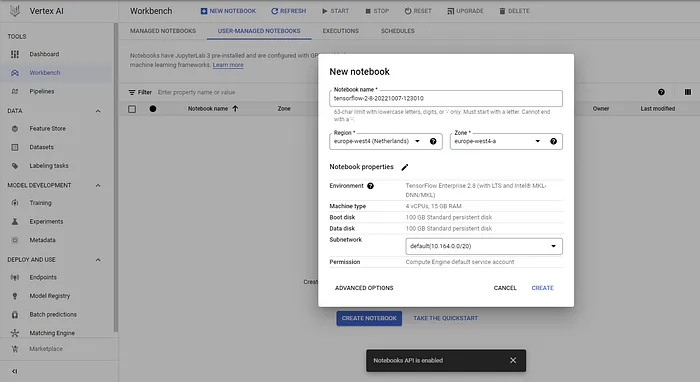
Creating Vertex AI Workbench Notebook
It will take some time to be ready. While waiting, start creating other requirements.
Google Cloud Storage
- You can type “Cloud Storage” in the search bar and click the one under “Product and Pages”.
- Click Create
- Name your bucket in this format: “[your project ID]-[name of your bucket]”
- Choose “europe-west4” for the region and click Create
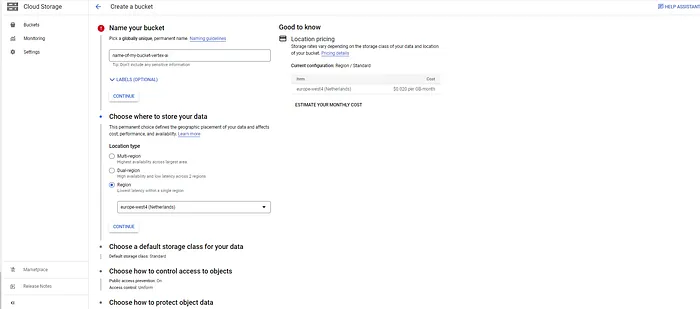
Creating cloud storage
And we are done! We will add the dataset here later.
Docker Repository in Artifact Registry
- You can type “Artifact Registry” in the search bar and click the one under “Product and Pages”.
- Click Create repository
- Choose a name and choose “Docker” for the Format.
- For the location, choose “Region” and “europe-west4” and click Create.
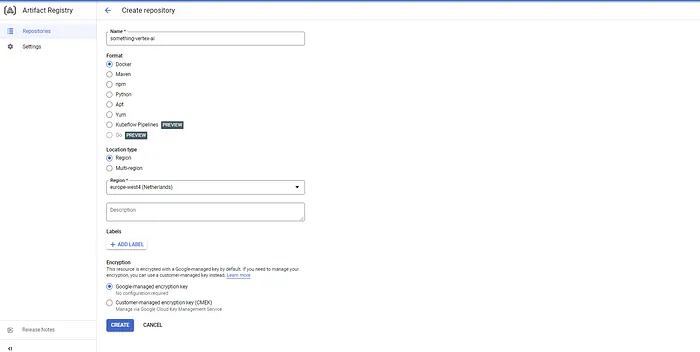
Creating a Docker repository in the Artifact Registry
Now we can add our data to GCS and start doing the necessary steps for training in Vertex AI!
Uploading data to GCS
from google.cloud import storagefrom google.cloud.storage.bucket import Bucketgcs_client = storage.Client(PROJECT_NAME)bucket: Bucket = gcs_client.bucket(BUCKET_NAME)train_blob = gcs_bucket.blob("tweet_eval_emotions/data/train/train.csv")test_blob = gcs_bucket.blob("tweet_eval_emotions/data/test/test.csv")validation_blob = gcs_bucket.blob("tweet_eval_emotions/data/validation/validation.csv")# Here I assume you have train, test and validation csv files in your local storagetrain_blob.upload_from_filename("train.csv")test_blob.upload_from_filename("test.csv")validation_blob.upload_from_filename("validation.csv")In this article, we will use the tweet_eval [2] dataset with emotions configuration using HF Datasets. After downloading the dataset using the “Datasets” library of HuggingFace, save all splits as “train.csv”, “test.csv” and “validation.csv”. The code above will connect your GCS bucket (you should set your BUCKET_NAME and PROJECT_NAME variables) and upload the dataset under the “tweet_eval_emotions/data” folder.
Now we are ready to create the training code and dockerize it to upload our Artifact Registry. After that, we will write the code to start hyperparameter tuning and training with the best parameters. To make this article short, we will make all of these in part 2.
Thanks for reading!